The days of single-option screenshots are, mercifully, long over, and there are several options for getting whole or selected shots of your screen on your PC. We’ll explore a few of those options here. (Pro Tip: If you’re in a hurry and need a quick answer, jump to Method 2.)
Method 1: Use the Print Screen Key
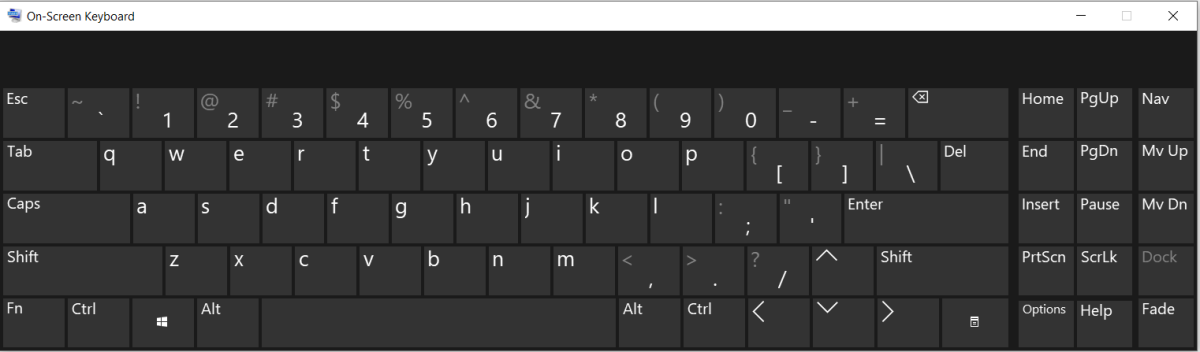
This is the most old-school method of taking a screenshot, but it still works. Assuming you have a keyboard with the Print Screen key (usually abbreviated as something like ‘PrtScn’) all you need to do is hit this key. Look along the right end of the top row of your keyboard, and you’ll usually find PrtScn. Using the key will create a snapshot of your active screen, open windows and all, and throw it on your Clipboard. From there, you will need to open some form of image editing software (Photoshop, GIMP, what have you) and copy the image from the Clipboard into an image. You can then crop the image however you like. Want to save yourself some time? Use the Windows Key + PrtScn hotkey combo. If you combine these two keys, you’ll take a shot of your entire screen, as before, but the resulting screenshot will automatically be saved to the Pictures > Screenshots folder on your computer. Desperately need a shot of a single window? Use the Alt + PrtScn hotkey combo. This will take a picture of your active window rather than the whole screen. You’ll then have to copy the image into editing software, as above, to save your shot from the Clipboard. All that said, Print Screen is a dated way to take screenshots. It’s not often that you’ll want or need a shot of your entire screen, and even without cropping Print Screen adds a couple of unnecessary steps. Unless other options aren’t available, you won’t want to use Print Screen. (Can’t find the PrtScn key? Some keyboards don’t have one. If you can’t find the key, search for your computer’s On-Screen Keyboard, depicted above. PrtScn is on the far-right side of the keyboard, in the second-last row.)
Method 2: Use Snip & Sketch (Recommended)
This second method involves a built-in program called Snip & Sketch. Though you can open Snip & Sketch like any other app, you can also call it up much more easily with a keyboard shortcut: Windows Key + Shift + S. This will darken your screen and generate a small window at the top of the monitor that will allow you to make a selected crop of the screen, a freeform crop of the screen, a snapshot of a single window, or just a shot of the whole screen. Once you’ve made your screenshot, another window opens, allowing you to see the screenshot properly in Snip & Sketch. Here you can mark up the image if there are elements that require highlighting, crop it further, and then save it as a .png, .jpg, or .gif. Despite coming second on this list Snip & Sketch is the recommended method for creating a screenshot on Windows 10. Having a keyboard shortcut will save you a bit of time on each screenshot - which adds up if you’re making a lot of them each day - and the ability to quickly edit the screenshot without opening another program is a nice feature.
Method 3: Use Snipping Tool
More or less an outdated version of Snip & Sketch, Snipping Tool is another built-in app that will allow you to quickly and easily take screenshots. It works almost the same as Snip & Sketch: Open the app, choose the portion of the screen you want to turn into a screenshot, save the results. There are a number of in-app editing options available as well. So why use Snip & Sketch over Snipping Tool? There are two reasons. First, you can open multiple iterations of Snip & Sketch simultaneously. This will allow you to edit multiple images and come back to one later without closing anything. Snipping Tool only allows you to open one iteration of the program. And, second, Snip & Sketch has the built-in keyboard shortcut that opens it right up. You can add a custom keyboard shortcut for Snipping Tool, but… why bother? That’s extra work you don’t need to do. Snipping Tool is handy for users who still have an older version of Windows. It works perfectly well. If you have Windows 10, however, you should be using Snip & Sketch for your screenshots.
Method 4: Use Game Bar
Also known as Xbox Game Bar, this method is intended for gamers but can be used by anybody. Either call up Game Bar in the search window or hit the Windows + G keyboard combo. This will darken the screen and call up Game Bar, and if you check the Capture window (top-left corner of the screen) there is an option for capturing your screen, either via that menu or the Windows + Alt + PrtScn combo. You can also use Game Bar to take videos. Images and videos alike are saved under Settings > Gaming > Gaming Captures > Open Folder. In general Game Bar is not recommended. It’s handy when working with video games, yes, but most users will be taking screenshots of sections of their screen, and Game Bar takes a snapshot of everything.
Snip & Sketch Is the Best Method
Use Snip & Sketch. Yes, there are other options, and yes, there are many, many other programs you can download and use to make screenshots, but Snip & Sketch is by far the most convenient option for Windows 10 users. This content is accurate and true to the best of the author’s knowledge and is not meant to substitute for formal and individualized advice from a qualified professional.